Everything You Need To Know Before Integrating GSC Into Your Website
There is no doubt that you would love to see your website at the top of the search result. But with thousands of websites coming live every day it becomes quite challenging to achieve this feat.
Meaning achieving this feat is not an easy task, and if you really want to get to this level then you’ll really need a powerful website presence online. And when it comes to having or making a powerful online presence then SEO is the best way to do this.
And this is where Google Search Console earlier known as Google webmaster comes into the picture. Here in this article we have prepared a guide for you to learn everything about GSC Google before you implement it on your amazing website.
So without taking much of your time let’s begin
Meaning of Google Search Console
Earlier known as Google webmaster, Google Search Console is a free-of-cost service provided by Google which helps the user better analyze their website traffic. When you use GSC Google you can analyze how many people are looking online for your website, what keywords they search for and how exactly they engage with our content.
It’s important to have a fully functional website if you want your business to rank higher in SERP results. And with Google search engine console this can be achieved because it entails several benefits like

Easy to track your efforts
It’s important that you track your progress about how your website is performing and this can be easily done with GSC. Google Search Console provides you with very detailed reports that you can use to analyze your efforts.
And having Google Search Console is an excellent option for you to employ on your website which will help in tracking the progress of your marketing initiatives. Based on the result you get after analyzing the reports you can make changes to your website and your SEO and marketing strategies.
Easy to analyze SEO efforts
SEO is a long game and it’s crucial that you play it right from the beginning. Because if you don’t get it right from the beginning then you might lose the top spot and if worse comes to happen then you can even lose the game.

And that’s where Webmaster Search Console will help you analyze your website by providing you with detailed SEO audit reports. Based on those reports you can see how your keywords are performing and is there any broken link on your website which needs to be changed, etc. All this will help you keep track of your SEO efforts from day one.
Easy to understand mobile friendliness
Almost all of us use a mobile phone, maybe to buy something, sell something, rent something or simply learn about something. So it’s fair to say that mobile phones are now a crucial part of our everyday life. And these numbers here are the proof.
now a crucial part of our everyday life. And these numbers here are the proof.
Now if the usage of mobile phones is at an all-time high doesn’t it become crucial for website owners like you to have a mobile-friendly website? And by integrating GSC Google into your website you can even overcome this barrier with minimum effort.
Easy to integrate
Another thing that makes the search console so important is that it’s free of cost and is really easy to integrate. Yes, you read that right the Google Search Console is free of cost and you get all the features that you have to pay for when taking some other SEO tool.

Apart from this, it is fairly easy to integrate because it’s a tool offered by Google which makes it fairly easy to iterate it.
Now that you understand the importance of the Google search console it’s time we move to the next segment of this detailed guide. And that is how you get quick access to the search console.
How To Get Quick Access To Google Search Console
Getting access to GSC Google is no rocket science because all you have to do is follow these steps.
Step 1 – Sign up with your Google account in the search console
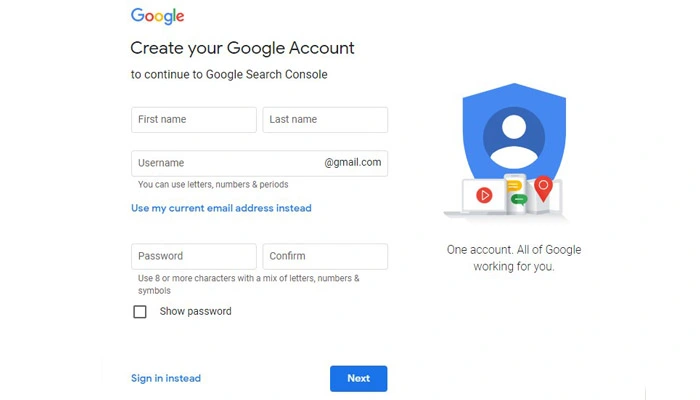
The very first thing you need to do is log in with your Gmail account into the search console. You can either make a new id or use an existing one. And if you have an Adword or Google Analytics login you can use that too to login into the Google Search Console.
Step 2 – Enter your domain and add the property
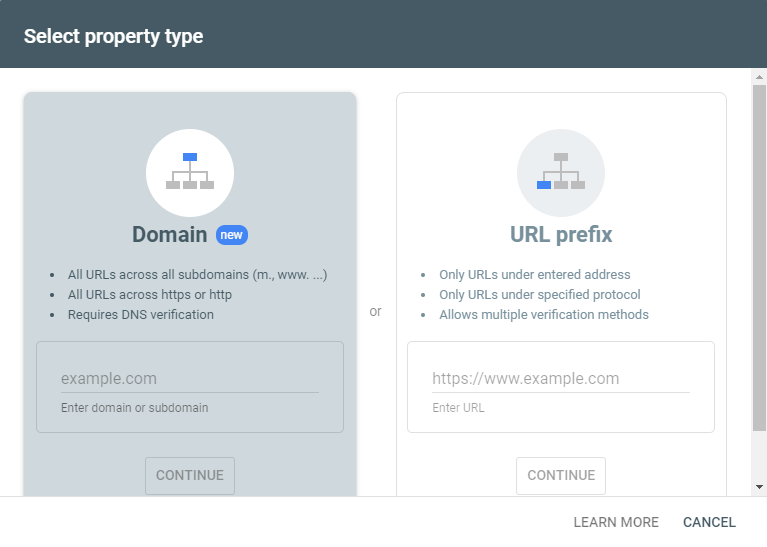
Now that you are inside the console you’ll get an option to add property. You can do that either by domain or URL prefix. If you connect your GSC Google console with a domain prefix you’ll connect all your site aspects including all subdomains and prefixes associated with it.
Step 3 – Complete the verification
After adding the property you’ll need to verify your website to start gathering important data via your search console. This step is done based on which method you choose to add the property.
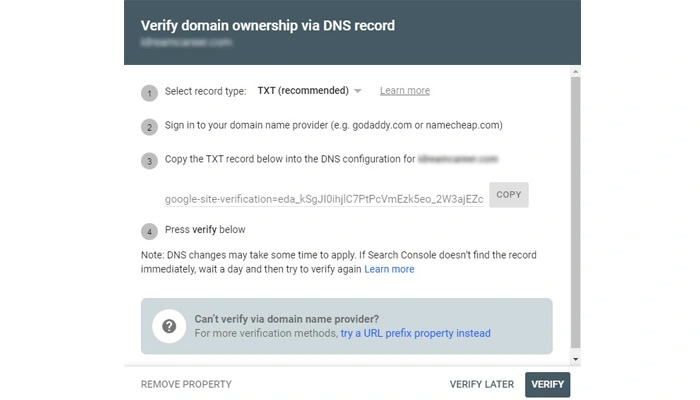
If you add property via Domain then you’ll have to verify it via DNS (Domain service provider). You’ll see your DNS provider which will also display detailed instructions from there you can select your provider.
After that, you select the copy button next to the TXT record.
Once you have copied the text, open your domain site and open your account.
From there select the domain you want to configure. Depending on your service provider the approach to reaching a DNS record is different but wherever you see DNS you should click on it.
After which you’ll be brought to the domain management screen and there you have to add ll have to click on “add” to add a new property.
After which you’ll have to fill in different values like “Type” “Host” “TXT Value”
and “TTL”.
Although you have to keep in mind that the verification can take up to 72 hours.
Other methods to verify
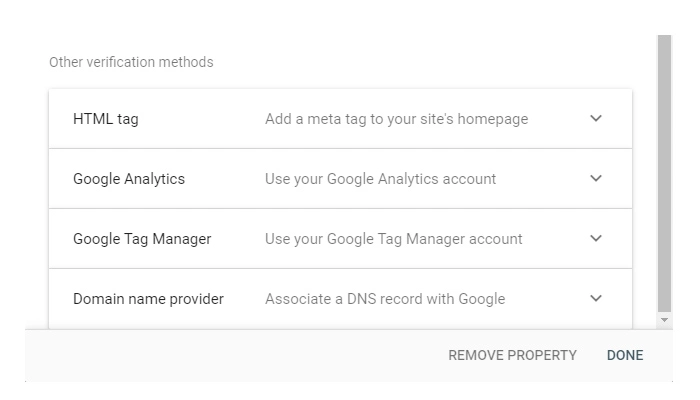
Via HTML File
If you are using this method you’ll need access to your server or cPanel file manager. And if you are compatible with doing so then you’ll need to upload an HTML file into your root folder. And to do so you have to follow these steps
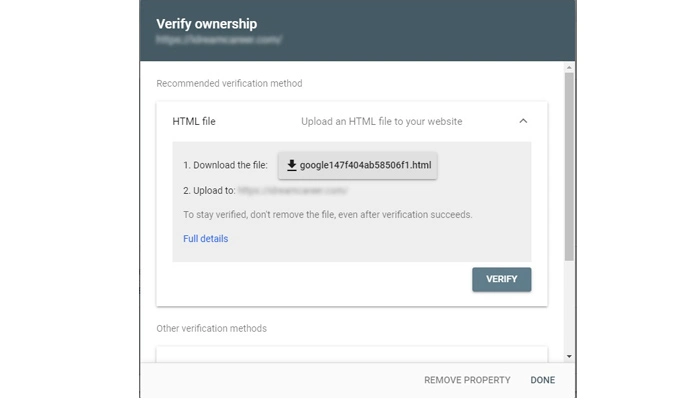
Step 1 – Download your HTML file
Step 2 – Visit your site’s root directory
Step 3 – Upload the file
Step 4 – Click on “Verify” in your search console
Via HTML Tag
If you go ahead with the method of verification then you’ll need to add a meta tag in your site’s header section for which you’ll need developer access.
Let’s take WordPress for instance where you can do this either by adding the tag directly into your header.php file or you can use a WordPress plugin.
Here are the steps you have to follow to verify the HTML tag using a WordPress plugin
- Copy the tag
- Login to your WordPress admin page
- Install the “Insert Header and Footer plugin”
- Paste the tag into the “Scripts in Header” section
- Click on “Verify” in the search console
Step 4 – Submit your website
Now you have done the verification it’s time to submit the sitemap in Google Search Console. Submitting an XML sitemap is a crucial task and plays a key role in ranking your website. We will discuss this in detail in the article at a later stage.
But once you are done with this your website will be crawled and indexed by Google.
How To See Overall Performance Report In GSC
Google search console provides users with very detailed reports which makes it easier for them to analyze their efforts. But before we move on to how to see the overall performance report let us first understand what a performance report is.
What Is A Performance Report
It is a detailed report provided by GSC Google where you see all important metrics related to your website. This included your SERP rankings, total clicks, impression, ACTR (Average Click Through Rate), etc.
Now let’s see how you can see the entire report in your search console
Step 1 – Open your search console dashboard
Step 2 – Click on the overview
Step 3 – Click on open report
Step 4 – Read the report
But before you start reading the report it’s important that you understand some terminology which will make it easy for you to understand the report.
Metrics
It can be simply understood as a quantitative measurement that shows how your website/SEO efforts are performing. There are different kinds of metrics that you should look out for in your GSC report
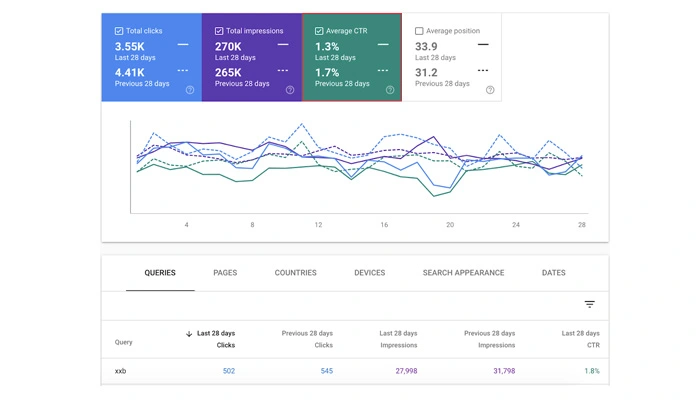
- Impression – How many times did your website/business appear in the search result when the user searched for it
- Click – How many people actually clicked on your website/business
- ACTR – Calculated by dividing Click through rate by total clicks
- Avg position – What’s the ranking of your website on Google
Dimension
They are attributes of your data which give you a clear idea of where people are coming from, what they are interacting with, etc. Just like metrics dimension also has several kinds like
- Demographic – Where your user is coming from
- Pages – Which ages are users engaging with
- Devices used – Which device user used to visit your website
- Query – Which query user search for that led them to your page
Hopefully, after reading this it will be a little easier for you to understand the GSC report and make any necessary changes if needed.
How To See Every Notification In GSC
When you make your website live and start promoting it there are different things that can affect its ranking. From SEO tactics to the type of content published, anything can either make your website go up or down in the SERP result.
And as an owner of that website you need to keep track of such things and make necessary changes. To help you with this Google Search Console sends notifications every once in a while stating the latest happenings like total impressions, clicks, CTR, etc on your website.
GSC Google gives you the flexibility of choosing the frequency of these notifications. You find this setting under the campaign section where you’ll have to choose email notification.
Open Campaigns ->Email Notifications -> Scroll down and click on Search Console -> Click on Add Alert
There is another important thing that you need to keep track of apart from the notification and that’s setting up an XML sitemap on your website. And that’s what we are going to discuss next.
How To Add XML Sitemap Of Your Website In GSC
It is important that you add your XML sitemap to your website so that the Google crawlers can easily crawl your website which will improve your overall SERP rankings.
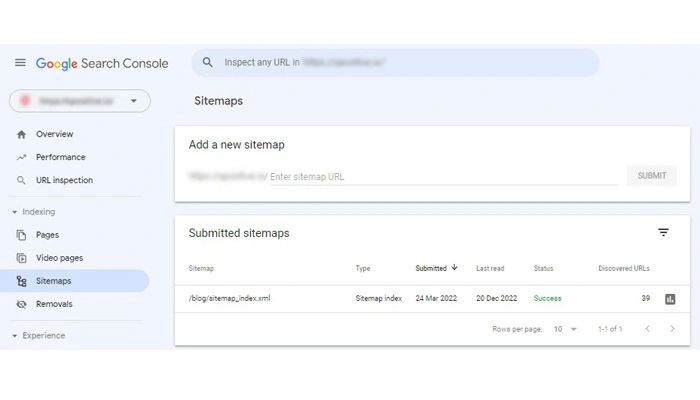
And to add an XML sitemap you’ll have to follow these steps
- Log in to your GSC Google portal
- Enter your email address and password
- Enter the URL of your website
- Click on the crawl (left side of the screen) and then on sitemaps
- Enter the URL of your sitemap in GSC and press enter
- Now click on the view test result
- Check for errors and click on close test
- Click on add sitemap again and press the submit button
- Refresh page
- Check for any error (if there is any)
How To Check The Average CTR Of Your Website In GSC
You get a lot out of your Google Search Console report and the average CTR (Click Through Rate) is one of them.
ACTR is a metric that shows how many people visited your website when they saw you in the search result. And to calculate your website ACTR you’ll need to follow these steps
- Export your data from GSC
- Group, it ceased on different metrics and dimensions
After you have done this you’ll have to keep an eye out for total impressions and the number of clicks on your website. Because to provide you with ACTR Google divided your total impression by the total number of clicks.
Conclusion
It is impossible to improve rankings if you do not understand the competitive landscape. There are a lot of data and insights about your website and google penalty that are available through Google Search Console, a free tool. However, due to the fact that SEO is a multiplayer game rather than a single-player game, is its biggest limitation.
Hopefully, after reading this guide you now understand that it is easy to use Google Search Console without any problems. This free tool will help you make your website more optimized and enable you to rank higher on search engines.
FAQ
How to see every notification in GSC?
You can receive every important notification from the Google search console by changing the setting from your search console panel.
To see every notification from your GSC Google panel you’ll have to follow this map
Open Campaigns ->Email Notifications -> Scroll down and click on Search Console -> Click on Add Alert
How to add an XML sitemap of your website in GSC?
Adding an XML sitemap to your website helps you understand how people are interacting with your business. And to add it to your website you’ll have to follow these steps
- Log in to your GSC Google portal
- Enter your email address and password
- Enter the URL of your website
- Click on the crawl (left side of the screen) and then on sitemaps
- Enter the URL of your sitemap in GSC and press enter
- Now click on the view test result
- Check for errors and click on close test
- Click on add sitemap again and press the submit button
- Refresh page
- Check for any error (if there is any)
How to check the average CTR of your website in GSC?
To check the average CTR of your website you’ll need two things
- Total impressions
- Total clicks
After this, you have to divide the total impression by the total clicks and the result is your average CTR.


